47 out of 5 stars 36. The item Gates Drive Belt 2013-2014 John Deere Gator XUV 825i 44 Power Steering ur is in sale since Thursday May 18 2017.
Clutch Rattling Belt Jumping Problems John Deere Gator Forums
Route the belt over pulley A of the driven clutch.

John deere gator drive belt adjustment. I pulled it in the garage last night and washed it off. Front shaft at engine is round and smooth is it supposed to have notches on it. Everyday Low Price on your Vehicle Parts Accessories and More.
On top of the carburetor are two screws the low-speed adjustment screw that goes directly into the carburetor and the idle adjustment screw that sits against the throttle linkage. How to Adjust a John Deere Drive Belt. POWERSPORTSiD is your trusted source for all your John Deere Gator XUV 855D Diesel Drivetrain Transmission Parts needs.
Enjoy low shipping and other great deals available here now. Get it Wed Feb 17 - Fri Feb 19. Front read more.
Tighten axle housing nuts A to 90 Nm 70 lb-ft then back off adjustment bolts C one half turn to relieve force on bolt. The John Deere GX85 and SX85 PIN riding lawn mowers are each equipped with a primary drive belt that powers them forwa. On select New John Deere Gator Utility Vehicles.
Install clutch enclosure cover. Make sure chain tension is the same at both sides of vehicle. John Deere Gator 825I Just put on a new drive belt purchased from John Deere new one is a little shorter than old one I took off but has a lot of slack and still slips.
To start viewing messages select the forum that you want to visit from the selection below. Contact us on our contact us page or at 816616-9946 with any questions. On the 4 cyl the front belt drives the power steering and the ac and the rear belt drives the water pump and the alternator.
Press down on the John Deere lawn and garden tractors accelerator pedal with your hand just until the pedal starts to stiffen becoming harder to press. Sixity is American-owned and operated. HPX Trail Gator 4x4.
Increase your response time performance with the Dayco HPX Drive Belt for your John Deere Gator RSX 850i or 860i model. I was thinking that the belt probably got wet and was slipping. John deere clutch adjustment.
Turn adjustment bolts C at both sides to remove chain sag. Tighten down the nuts on the adjustment rod. Built with cogs in its top the belt provides additional.
The variable-speed drive consists of two clutches and a drive belt. John Deere Gator Drive Belt for 4X2 HPX and 4X4 HPX Gators UC14244 M155037. Open the rear gate and lock into place to expose the engine.
Is there an adjustment. Is there an adjustment. HPX High Performance Extreme Drive Belt by Dayco.
Order your UTV parts and accessories at Side By Side Stuff now. If this is your first visit be sure to check out the FAQ by clicking the link above. Press down on the John Deere lawn and garden tractors accelerator pedal with your hand just until the pedal starts to stiffen.
When pulling it out the garage to take it back to the barn it didnt want to move very well. The transmission drive belt may or may not need an adjustment. Determining Whether Adjustment Is Required.
A 626 has two belts. The transmission drive belt may or may not need an adjustment. Install new belt by routing over drive pulley and then over the driven clutch pulley.
It started and ran fine but just moved really slow. John Deere Gator 825I Just put on a new drive belt purchased from John Deere new one is a little shorter than old one I took off but has a lot of slack and still slips. You may have to register before you can post.
John Deere Original Equipment Belt RE28721. Adjust the adjustment rod until the gear shifter is sitting perfectly in the Neutral slot beside the drivers seat. We expand our inventory daily to give you the latest and greatest in Powersports products.
All questions are handled locally by personnel in our California offices. All of these are easy to change. Rugby League Europe Magazine.
Rotating the driven pulley will aid in removing the belt. Drive clutch is attached to the engine. Loosen the two nuts on the adjustment rod with the 15 mm wrench.
Altitude adjustment and cold-weather starting tested to -289C -20F. Check for proper and equal chain tension at both sides of vehicle. Lower the cargo box.
Route belt over drive pulley B to remove. With any questions about our business or products. XUV General Discussion John Deere Gator 2011 -.
Only 5 left in stock - order soon. I had the xuv 550 out yesterday and got it covered in mud. 50 out of 5 stars 2.
Locate the carburetor on the right side of the engine beside the valve cover. One drives the power steering and water pump rear belt in 6 cyl and other front belt drives the ac and alternator. Click the register link above to proceed.
I got it to the barn slowly and just parked it because it was.
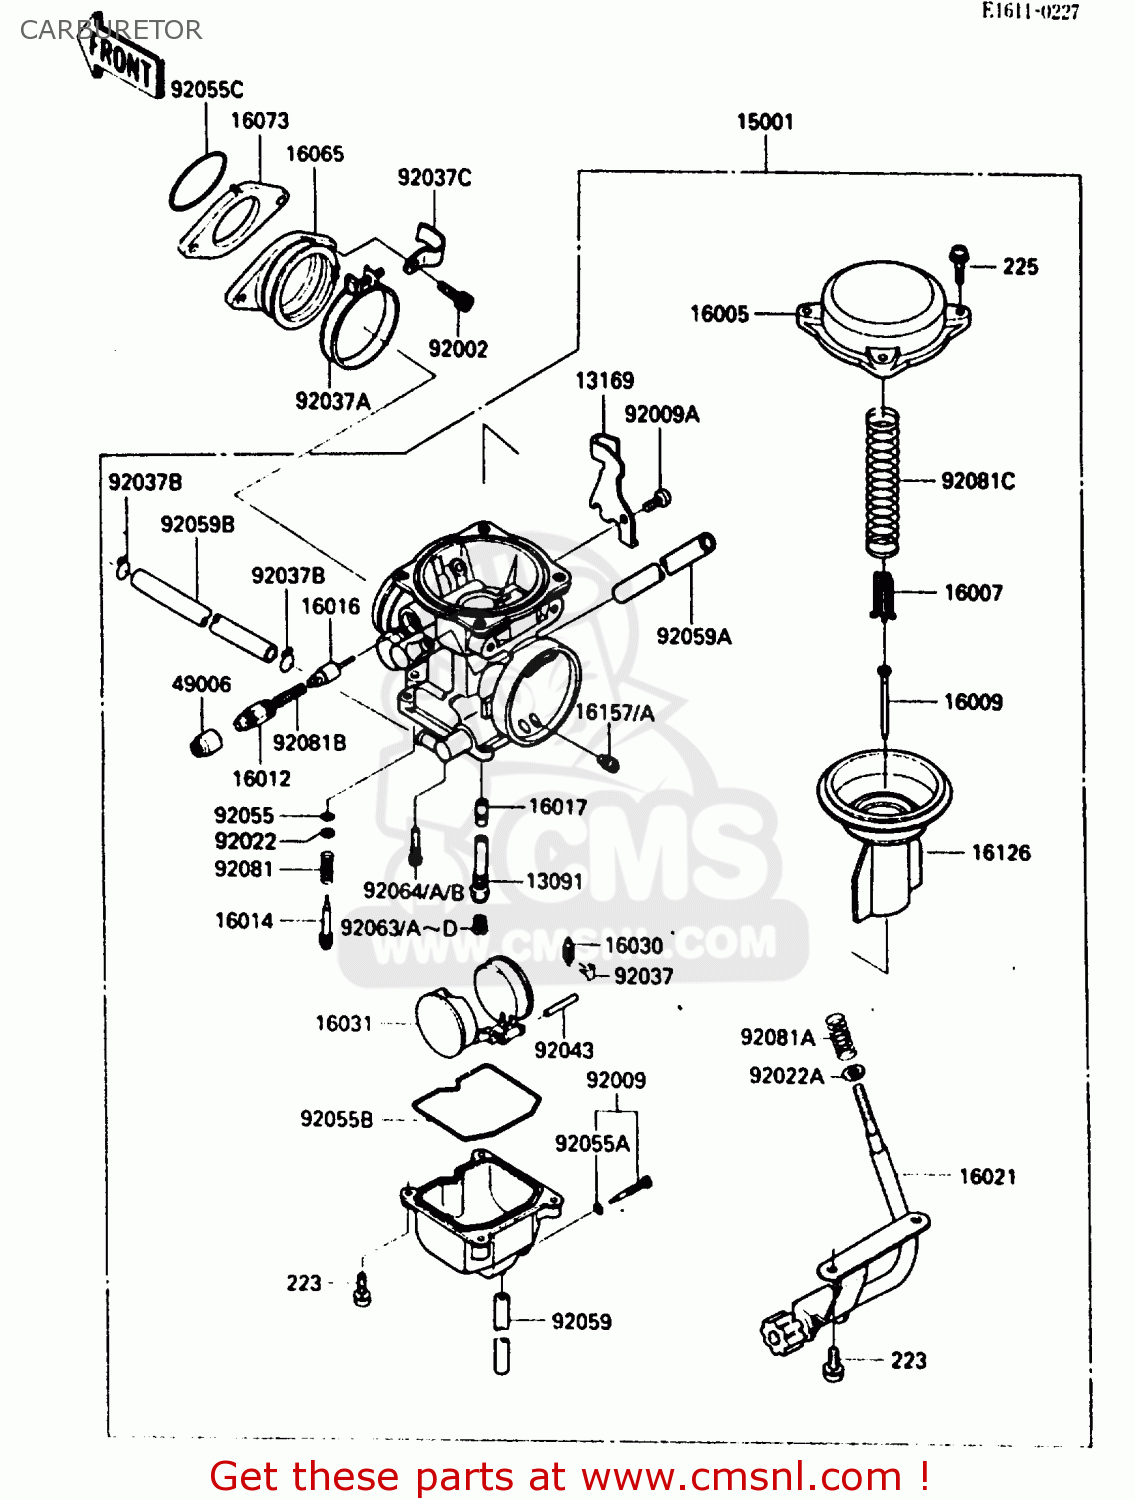
The Kawasaki Bayou is an All Terrain Vehicle ATV and is available in many sizes. Kawasaki Bayou 250 - KLF250-A3 CARBURETOR Diagram.
 Diagram Kawasaki Bayou 220 Repair Manual Carburator Diagram Full Version Hd Quality Carburator Diagram Guidediagram Virtual Edge It
The adjustments can include making the idle midrange and.
Kawasaki bayou 250 carburetor adjustment. When I let go of the throttle it will backfire. In This video we are finding Top Dead Center TDC Checking Valves and giving clearances for a Kawasaki Bayou 220. KLF 250 offroad vehicle pdf manual download.
Offroad Vehicle Kawasaki Bayou 300 Owners Manual 143 pages. Make sure you clean area around carb before removalClick the link below for the. Kawasaki klf 250 service manual pdf download.
My pilot air screw is between the air box and the carburetor. Join Yahoo Answers. 516 504 Add.
Ships in 3 to 4 days. With the engine idling turn the handlebar to both. 2006 kawasaki bayou 250 review top speed.
On a 2003 Kawasaki Bayou 250 I need some technical support on adjusting the pilot air screw and idol screw on that carburetor. However I did get it to idle smoothly I am just struggling with these other details. The carburetor will be connected between the engine and the gas tank.
Kawasaki motorcycle carburetors provide the fuel-and-air mixture necessary for the vehicle to produce its high performance. View online or download Kawasaki BAYOU 250 Service Manual. I have a 2001 Kawasaki Bayou 220 and I am struggling to adjust the carburetor on it properly.
Quick clean-up carburetor from a Kawasaki Quad. Kawasaki BAYOU 250 Pdf User Manuals. Carburetor for Kawasaki Bayou 220 KLF220 KLF 220 1988-1998 Bayou 250 KLF250A KLF 250 2003-2011 ATV Quad Replaces Kawasaki 15003-1080 38 out of 5 stars 57 2099 20.
It also will not run smoothly when I hold the throttle down about mid way. I ended up not making adjustments because they wer. Can anyone tell me when you screw it in how many times you back it out on the.
Hello Select your address. The carburetor will be connected between the engine and the gas tank. WASHERADJUST SCREW 92022-1187.
Tuning and adjusting the carburetor on such a motorcycle is the best way to get the most effective riding results from the bike. I used a wirebrush for jet-cleaning. 3-10 FUEL SYSTEM Carburetor Idle Speed Adjustment Start the engine and warm it up thoroughly.
Carburetor for Kawasaki Bayou 220 KLF220 KLF 220 1988-1998 Bayou KLF 250 2003-2011 - Kawasaki Carburetor. Buy OEM Parts for Kawasaki ATV 2005 CARBURETOR Diagram. New Carburetor For Kawasaki Bayou 250 KLF250A klf250 With Inline Fuel Filter 2003-2011.
FREE Shipping on orders of 149 or. How to inspect and adjust the fuel level is critical to performance and mileage. Get it as soon as Fri Jan 8.
41 out of 5 stars 48. Buy OEM Parts for Kawasaki ATV 1998 CARBURETOR Diagram. The carburetor on all of the Kawasaki Bayou models is connected the same way unless the Bayou is heavily modified.
You commit an error. You will need to remove the seat to excess the top of the engine. Just rebuilt my carb.
Kawasaki atv parts best reviews amp cheap prices for. In this video we explaining the removal of a Carburetor on a Bayou 300 ATV. How to set kawasaki bayou 300 valves made man How do you adjust the clutch on a 1995 Kawasaki Bayou.
I demonstrate rich and lean INCORRECT settings as w. FREE Shipping on orders over 25 shipped by Amazon. How to set a carb float.
More Bayou 220 service videoshttpsy. Kawasaki bayou 250 carburetor adjustment altahaddi net. View and Download Kawasaki KLF 250 service manual online.
I wanted to check the valve clearance on our Kawasaki Bayou 220 KLF220 while I was doing other work to it.
Choose your additional accessories shower arm shower hose slide bar soap dish etc. I have an older model Grohe Therm.
 Hansgrohe 04233xxs Adjustments Terry Love Plumbing Advice Remodel Diy Professional Forum
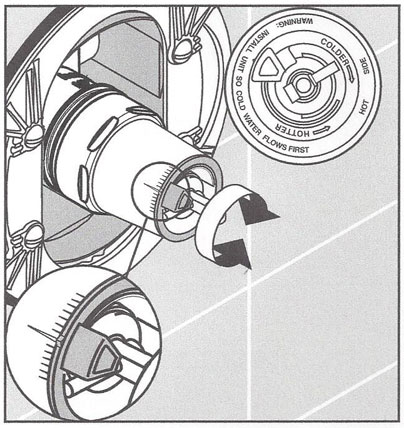
Slowly rotate the black adjustment knob away from you until youre satisfied with the temperature and then reinstall the faucet cap.

Grohe shower mixer valve adjustment. Replace the handle stop disk and be certai. The thermostatic Grohe faucets have a hot-water-limit stop under the temperature adjustment handle. Flushed before installing the mixing valve.
Shower valve - Ive pulled out the cold and hot valve bodies and cleaned the filters and Ive pulled out the main center mixer valve body and replaced the o-rings. By responding to any fluctuations in the water supply you can enjoy your shower safe in the knowledge that the temperature will remain constant for the duration. The thermostatic shower mixing valve can be installed in two diff erent ways.
Most mixer valves come with a maximum preset temperature for safety reasons. The safety valve when attached can only turn half way to the right clockwise effectively limiting the temperature to 90 per cent of what your pipes are capable of without the safety valve. Adjusting GrohTherm SmartControl Thermostatic Valve Many of Grohes faucet trim sets feature the GrohTherm SmartControl design which includes a series of push-button diverters and pressure valves plus a large central knob that controls the water temperature.
Exposed shower mixer with hand shower. For a typical Grohe kitchen faucet like the LadyLux start by turning the handle into the upright and on position and then push down to remove the handle. If you have further questio.
It can be used to switch between a head and hand shower or for example between a headhand shower and a bath spout. This Avensys mixing valve is a thermostatic mixer with wax cartridge. Concealed thermostat with hand shower.
Press down on the tap knob depressing it into the mixer housing from its resting position to adjust the temperature of the water. Adjust the flow of the cold water until a desired temperature is reached. Screw in the handle and put the cover back on.
3 - Loosen the screw then remove the handle. And with its two valves this mixer is a great flexible solution for both baths and showers. Install a single-lever bathshower faucet.
Choose your shower outlets showerheads hand showers body sprays Second. You can tell that you have a mixer shower as opposed to an electric shower because your shower controls will just consist of a knob on the wall or something attached to the bath taps. Product Description Enjoy the ease of push-turn control for your bath or shower with the GROHE SmartControl concealed mixer.
GROHE Grohtherm SmartControl thermostats state-of-the-art technology meets unique design. Thermostatic mixer valves are found in thermostatic mixer showers which are a specific kind of mixer shower. Turn the circular dial to the left counterclockwise to activate the safety valve and reduce the maximum temperature the faucet is capable of.
Adjust the thermostatic cartridge by turning the notched black element until the temperature reaches 38C. Turn the circular dial to the left counterclockwise to activate the safety valve and reduce the maximum temperature the tap can produce. Find a Showroom or Installer.
What is a shower toilet exactly. Install a thermostatic bathshower mixer. If the shower water is not as hot as you prefer this stop can be adjusted to provide higher.
Download How to adjust the left boiling water handle. Loosen the screw then remove the handle. GROHE recommends installing isolating valves upstream of the mixing valve for.
Thermostatic Shower Valves - for a single Shower Outlet Our thermostatic shower valves give precise control over the temperature of your shower water. You will always get a certain amount of cold water even if the cold water handle is in the off position. SmartControl Concealed mixer with 3 valves.
GROHE Red - Adjustment of the left handle. Follow these step by step instructions from GROHE experts and easily install our faucets shower systems and wall-hung toilet system. Follow this step by step installation guide to find out how to install your new thermostatic bathshower mixer from GROHE easily.
Put the handle back with the guide on the handle facing 38C. Next twist the cartridge cover counterclockwise until it comes all the way off. Turning the shut-.
Grohe training thermostat with cut through cartridge you grohe grohtherm thermostat rough in valve wayfair grohe 29120be0 grohtherm smartcontrol thermostatic 2 way shower installation guide install a thermostatic shower mixer grohe grohe thermostatic shower leak from stat adjustment water heater manual grohe thermostatic shower problems. GROHE Sensia Arena - The better choice. It ensures the water temperature remains constant for the duration of your shower.
This in effect limits the amount of hot water that is mixed with cold water. Choose your mixing valve SmartControl Grohtherm 2-Hand Thermostatic Trims with the associated rough valve. The perfect choice for the modern bathroom.
4 - Run the water. The GROHE SmartControl mixer offers you effortless control as well as complete flexibility perfect for those you love to bathe and shower.
Savior Single D Style Carb Carburetor Adjustment Tool 308535001 Screwdriver for 2 Cycle Craftsman Ryobi Homelite String Trimmer Chainsaw Carburetor Adjusting Tool 45 out of 5 stars 98 652 6. There are two screws side by side.
C1u H60 Carburetor For 25cc 26cc 30cc Ryobi Homelite String Trimmer Ry28100 Ry28120 Ry28121 Ry28140 With Adjusting Tool Shopee Indonesia
Move the choke lever all the way down to the Full position.

Homelite string trimmer carburetor adjustment. 46 out of 5 stars 951. Locate the idle-adjustment screw on the Ryobi trimmer. While shopping online for an homelite string trimmer carburetor adjustment is easier and more convenient than shopping in person it is also harder to know if you are buying a high-quality product.
Start the Homelite HLT-15 by pressing the primer bulb seven times. Turn the screw to the left and note the engine performance. Homelite string trimmer - engine starting procedure.
Adjusting the carburetor on idle is the safest and easiest of the three speeds. John hill May 2008. Documenting how i fixed my homelite gas trimmer.
How to Adjust the Carburetor on a Homelite Weed Trimmer. The L screw controls the fuel mixture when the trimmer is operating at low speed and on a chainsaw its usually the first one you adjust although following an adjustment sequence isnt as important for a string trimmer. It will start on full choke but dies when trying to run on any other setting - if you try to rev on full choke it will also die.
Even when the online pictures are an honest representation of the item it is hard to see any tiny details in the photos. 25cc string trimmers 24 pages. Underneath the H and L screw is an idle screw marked C.
44 out of 5 stars 104 ratings. On the two-cycle Ryobi the adjustment screw is through the air-filter cover. Adjust the Homelite chainsaw carburetor by turning the high- and low-speed screws as needed.
Failure to follow and observe all safety instructions when adjusting all instructions may result in serious personal injury as the carburetor. Idle low and high. Locate the three adjustment screws found on the side of the carburetor just below the air filter.
Place the blower on a flat workbench. A Homelite chainsaw carburetor adjustment needs to be performed on all three speeds. The carb has red and clear plastic adjusting cogs instead of the usual screw adjusments.
Set the high speed screw by adjusting the screw marked H Pull the trigger so that the throttle opens as wide as possible. Lucky Seven Carburetor Adjustment Tool kit for 2 Common Cycle Carburator Adjusting Small Engine Carb Tune up Adjusting Tool- Echo STIHL Poulan Husqvarna MTD Ryobi Homelite String Trimmer. Electric string trimmeredger 30 pages Trimmer Homelite EASY REACH UT20002 Operators Manual.
Before you attempt any adjustment be sure that doing so will not void your Homelite warranty. The carburetor on a Homelite weed trimmer comes with adjustable screws that allow you to increase or. Stop turning the screw when the engine starts to make a high-pitched whine.
652 Get Fast Free Shipping with Amazon Prime FREE Returns. When leaves and other yard debris accumulate a gas blower can be just the ticket for cleanup. The three adjustment screws are labeled H for high L for low and LA for idle.
How do I adjust the carb on my 25cc Homelite weedeater. Bought it at a garage sale for 10 plus new gaskets 5 and it took less than 1 hr to get back up runningI b. Homelite manufactures a line of blowers powered.
Homelite UT32651 Engine Starting Procedure 2 pages. Newer carb adjusting screws require a special tool on most trimmers. KIPA Carburetor kit for 25cc 26cc 30cc Homelite Ryobi Craftsman Poulan Brushcutter Blower String Trimmer 308054013 308054012 308054004 308054008 Replace ZAMA C1U-H60 Carb 47 out of 5 stars 30 1075 10.
Savior Single D Style Carb Carburetor Adjustment Tool 308535001 Screwdriver for 2 Cycle Craftsman Ryobi Homelite String Trimmer Chainsaw Carburetor Adjusting Tool Brand. How to Adjust a Carburetor on a Homelite Gas Blower. Homelite line trimmer HLT25CDSNC is fitted with a spark arrestor.
They are marked H for the full throttle adjustment and L for the low speed adjustment. Press the trigger throttle and pull the starter cord until the. How do I adjust the mixture on my 25 cc Homelite.
You do not need to remove the cover to access the adjustment screw. Here is how to make one for nothing more than that free Bic pen you found last year. On the four-cycle Ryobi the idle adjustment screw is directly below the primer bulb.
3 2000 frontier torsion bar removal. Producing such prized and popular vehicles as the Altima the 370z the GTR and the Leaf Nissan continues to impress.

Posted by moosenewf on May 22 2008 Want Answer 0.
Nissan frontier torsion bar adjustment. Also please check out the statistics and reliability analysis of Nissan Frontier based on all problems reported for the Frontier. If its really tight raise the front end up to lower the force needed to turn the bolt. I need help determining how to repair the loose torsion bar anchor arms on my 2002 Nissan Frontier XE 24L 2WD that are causing popclunk noises.
2000 Frontier King Cab Join Date. Bought this truck in as-is condition no warranty from a local Nissan dealer about a year ago with 41000 miles on it. Suspension torsion bars are under stress and can contain a destructive amount of potential energy be safe and use protective gear at all times while adjusting the torsion bars.
This is to release the stress on the torsion bar so it can be adjusted easily. When your order your Torque Arm for your 1998-2004 Nissan vehicle you are getting the best parts Nissan has to offer. How to adjust a torsion bar Step 1 Jack up the vehicle on the wheel to be adjusted and set the frame rail onto a jack stand.
There are only torsion bars in the front. 1998-2004 Frontier diesel 4WD. Free lowering is awsomeanyway to adjust your torsion bars climb under your truck directly underneath your driver side doorsame on both sides you will see a bracket that holds the bar in place its pretty close to the frame in the bracket that holds in on there with.
The D22 Nissan Frontier torsion bars are manufactured from aircraft alloy steel and are designed to have a 20. There will be a bolt in the center of the mount pointing upward. 04 Supercharged Nissan Frontier Crew Cab 4X4 in light Gold.
Step 2 Crawl underneath the vehicle and locate the torsion bar mount on the frame. It will be in between a pocket in the rear cross member or inside the front lower control arm. Nissan Frontier owners have reported 6 problems related to suspension torsion bar under the suspension category.
When you demand superior suspension performance these torsion bars are the answer. Torsion Bar Adjusting Arm Front. Nissan - Suspension - Torsion Bars.
I got a 99 frontier xe. The frontrear I am referring to above are in reference to the front torsion bar anchor at the lower control arm and the rear torsion bar anchor in the crossmember as pictured above. This how to article is written to completely encompass everything involved with adjusting the torsion bars on a first gen Xterra independent front suspension.
Once the tension is removed from the bars mark on the frame the angle of the anchors for future reference slide back the rubber boots on the bars themselves to expose. And their OEM replacement parts and accessories are no exception. Not familiar with your specific vehicle but torsion bars have an adjusting bolt at the front or the rear.
Display Modes 1 10-26-2012 1102 AM lawtn. I lowered mine with the torsion bars in the front then i just took out a leaf spring in the back. The front is the only end you can adjust.
2003 Nissan Frontier torsion bar replacement and how to adjustThanks fro any help you can offer. Genuine Nissan Part - 43245-C040A 43245-C0400 43245C040A. 99-04 Frontier V6 Only 1998 Frontier 4cyl 4WD Only 00-04 Xterra.
Genuine Nissan Part - 54080-2S600 54080-8Z400 540802S600. These torsion bars are aftermarket Nissan Frontier D22 torsion bars are designed specifically for lifted and lowered Nissan Frontier D22 SUVs. I dont remember the exact numbers but it is measured with a special bar that is hooked to both lower control arms at the ball joints not bolted to them just clamped to them and guaged from the torsion bar.
Red 89 TGP 1495 14 mile Black 90 TGP 1441 14 mile White 90 Turbo STE 1506 14 mile Docs Red 90 TGP and now. Firstly the torsion bar is located under the car and runs from the lower control arm LCA under the front tire all the way to a cross member which is located near the rear of the front. Rear Torsion Bar Anchor Adjustment Lower Thicker Nut.
Nissan - Suspension - Torsion Bars. Frontier Nissan FrontierHBTruck Discussion Forum Thread Tools. The most recently reported issues are listed below.
Torsion Bar Adjusting Arm Nut. In the rear you have coil springs. Finished installing new upper and lower control arms had to go back and adjust ride height for front of vehicle anchor arm of torsion has to be within a di.